In early December a random Facebook theme led me on to a whole new world of miniatures that I had never come across before. The manufacturers are in China and/or Japan and the first series I stumbled across was called 'Theatre in a Box' consisting of incredibly detailed scenes that fit into small decorated tins. The more I looked, the more I found, as it seems they have been churning out entire series of these for years, and it really was a rabbit hole. The kits are readily available on Amazon and other online English sites, but also from Chinese sites that ship internationally. There is obviously a big collector's market and there are many Youtube videos showing unboxing and assembly of the kits.
I was intrigued but also sceptical as the prices are low, about £8.50 for one kit/one tin and the photos were generally too small to make out much detail. I took a punt and ordered a trio of tins from Amazon (this one) which turned up before Christmas. Yesterday I felt like a change from quilting and lacing and decided to start making up one of the kits called 'Roaming around in Winter'. Inside the box were many bags full of a daunting number of components, and the pictorial instructions accompanied by a version of English required much study. I was amazed at the detail in this kit and I have no idea how they are doing these so cheaply. Everything you need apart from glue and tools is provided, including the lights and battery pack, and even a wooden display stand. There is a lot of clip art to cut out and glue onto laser cut components, various terrain materials, and various findings and squares of material for making up the contents. Although some of the components are a bit primitive, the final effect is quite good and when you turn the lights on, it's magical. I got sucked right in and ended up spending 12 hours over two days (including glue drying time) and quite enjoyed myself. Although you are assembling a kit, there is scope for personalisation and a fair bit of dexterity needed for the tiny components.

the tin

The Inn partway through the build, showing some of the internal detail including 3D fireplace
with decorated shelf inside the archway.
with decorated shelf inside the archway.
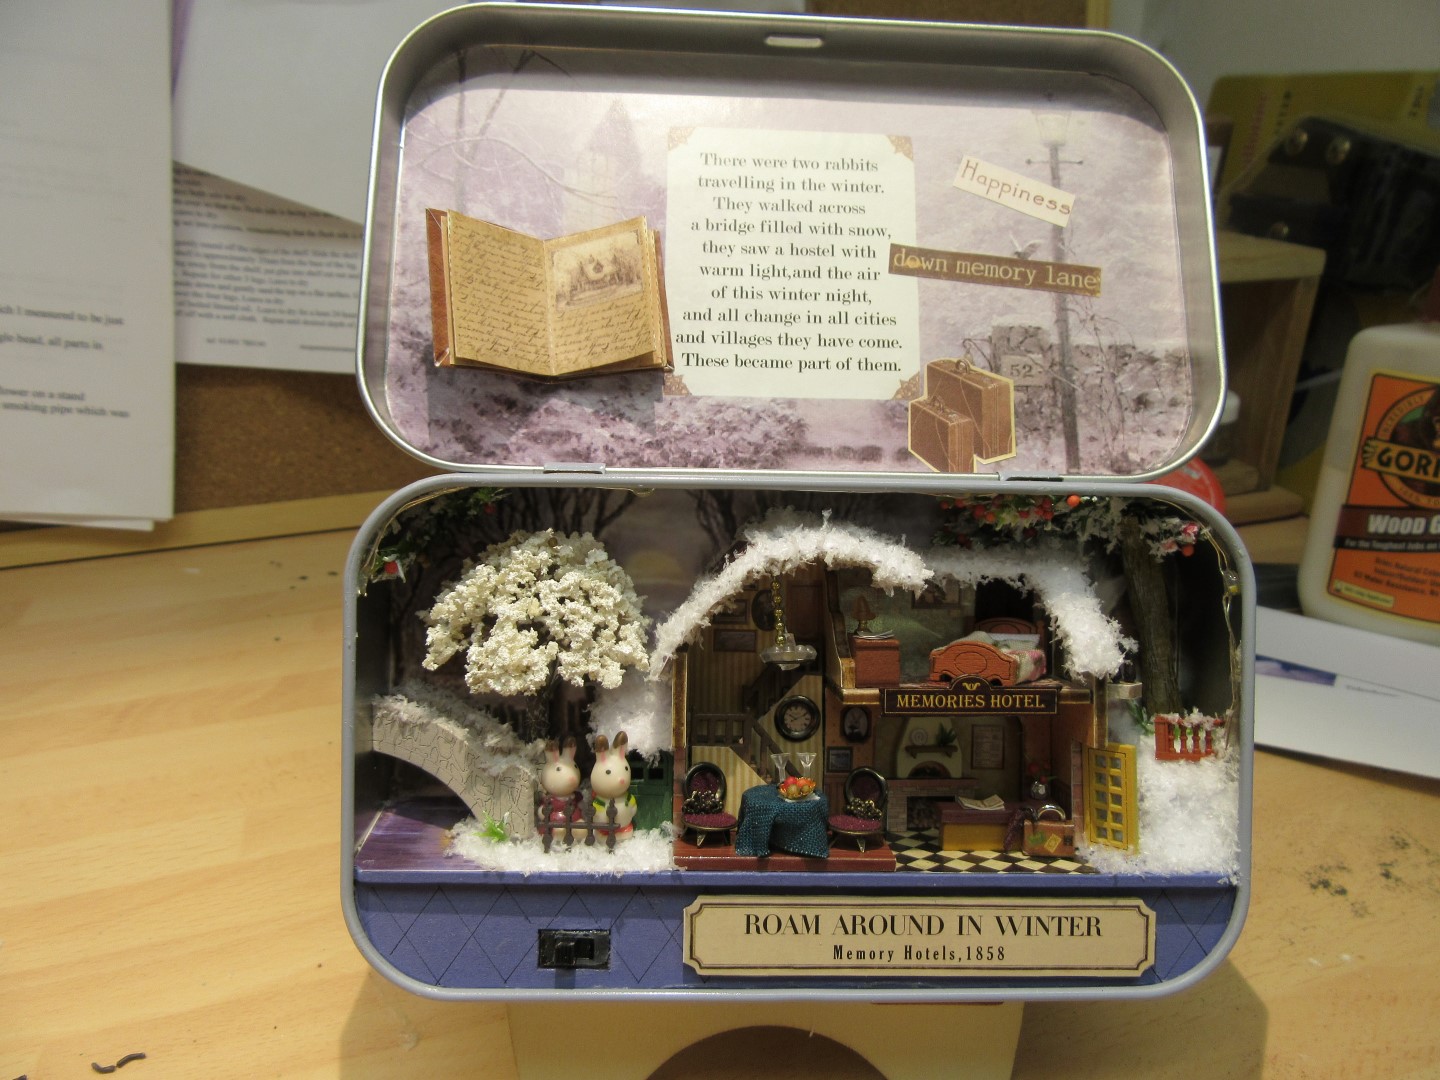
The finished tin on the display stand. The switch controls the lights,
the battery pack is hidden behind the sign plaque. The little book is 3-D and
you can turn the pages.
you can turn the pages.

the finished effect with the lights on. The kit includes the
pendant light and the LEDs around the rim.
pendant light and the LEDs around the rim.
I did finish knitting the Parlour Cat, it isn't fantastic but it is recognisably cat shaped. The real cat doesn't think much of it.


I've worked on my two Bucks Points lace projects on several days, read through a book about Bucks Point by Alexandra Stillwell which was quite interesting, and quilted on both my frame and at my sit down machine. I've progressed on my Latvian mitten as far as creating the thumb opening, and knit several more inches of twisted rope border onto my GAA Afghan.
On Thursday we had a family outing to the Warner Brothers Studio Tour Harry Potter exhibition. DH and I had been before but it was the first time for DS. A lot of the sets were themed for the season which was nice, plus there was a new exhibit about the Forbidden Forest featuring Aragog and Buckbeak. It was a fun thing to do as a family and since we all build models, we were all quite interested in the behind the scenes information about the modelmaking and artwork.

A recreation of the Yule Ball centrepiece in the
Great Hall at Hogwarts


Two more days off then back to work. Hope you've had a good week of holiday and have a happy new year.
1 comment:
Love your hanging rack. Will the house/village quilt fit there? Happy New Year!
Post a Comment